Where do I Start?
They are radios that can relay each other’s messages to a Base station if they are not able to speak to the Base directly due to range or obstructions.
You need to ‘Associate’ each node and the gateway to its unique Base and ‘Join’ each node to the mesh. If you have multiple Bases, be sure to do the Associations to ‘this’ Base well away from other Bases – read steps carefully!
- Step 1 Associate (during initial configuration) means to link a device (including the gateway) with the unique Base ID that defines each mesh. This is a semi-permanent action that prevents the device speaking to any other Base. Place each powered device within 3 feet of the operating Base until it flashes green.
- Step 2 Join (once the field-installation is underway) applies to a previously-Associated device connecting to either the Base or another node of ‘its’ mesh. Install the device in its proposed location. Confirm it is flashing green, and confirm the Base reports its data. Joining relies completely on the communication pathway between the node and its mesh partners. See Installation below.
- Step 3 Install Sensors (after mesh is reporting) and nodes are in their final locations.
- If you are installing multiple bases, do associations of nodes with one base at a time. This ensures you will know which nodes report to which base.
- A base cannot allow more than 15 nodes (routing or end) to associate at a time without the base being reset. This number is reduced by the number of nodes belonging to other meshes it might also hear, so do associations away from other active meshes.
- If you are associating large groups of nodes at once: Nodes should be associated with their base in groups of 8 or 10 at a time. Once done, move them far enough away (3000ft. +) so the base can’t hear them anymore. Restart the base; then the next batch can be brought in close for association.
An IRROmesh/SensMit system is ‘self-deploying’; the radios discover each other and so there is no need for specialized installation or programming skills. You don’t need special knowledge beyond the Installation Guide to get started and the Installation section of this document before setting any nodes up!
The first installations were in summer 2012, and those radios are going strong. We’re expecting at least a 6 year life.
You view your data on a cloud-hosted web service called SensMitWeb. There are three gateways available: a Cell Modem, a PC-link, and a Data Logger. The Modem sends data directly to SensMitWeb using your local cell network. PC-link and Logger use a PC with WindowsTM (Back to Top) software called SensMitPath to send the data to the website. There is also an option to use Logger to create data for Irrometer’s WaterGraph software directly.
No. The Base builds all the mesh pathways and chooses the optimal frequency sub-band for your system automatically. All you do is name the radios, input their GPS coordinates (if mapping is desired) and set any desired sensor alarms at the website. If a brand new radio is introduced to the mesh, the mesh automatically adopts it.
The data pathway components are: sensor, node, routing node, base, gateway, PC/PC file (if non-modem), uplink to WWW, and SensMitWeb. SensMit has advanced data retention processes, so if any of these links are missing or temporarily unavailable, the previous component retains its data until the link is re-established. Then data is automatically sent on.
Yes, SensMit works 24/7 in all weather conditions. SensMit uses super-capacitors instead of batteries, and advanced sleeping algorithms to manage power. A few minutes of direct sunlight will recharge a radio for over 24 hours of continuous operation. Only the cell modem has a conventional battery for the modem itself.
If you wish to stream data in real-time or access SensMitWeb’s growing catalogue of data reprocessing tools, yes. The SensMitWeb service gives complete access to SensMit functionality including system diagnostics and providing CSV downloads for WaterGraph. But if you just want logged data once a day for instance, and don’t need real-time diagnostics tools, a Logger plus Irrometer’s IRROmesh Downloader WindowsTM software lets you create the CSV files for WaterGraph directly.
The cases are rainproof but should always be mounted vertically. The components inside the cases are conformal coated for moisture protection but should not be directly exposed to water.
Design, Range and Coverage
Having a free-standing Base lets you install it in the location (say atop a tall pole) where it serves the mesh best. A free-standing Base also enables you to exchange Gateways without affecting the ongoing operation of your system.
A mesh consists of a Gateway, a Base, a skeleton of routing nodes, and End or ‘non-routing’ nodes to fill in ‘the gaps’, plus the sensors you attach. Routing nodes collect their own data and route other nodes’ information to the base. End nodes collect data but do not relay other nodes’ data, and speak to only one routing node.
The radios are rated for 1000 ft. over level terrain in clear line of sight in medium to dry conditions when installed in a mesh configuration. On hilly terrain, they can communicate farther. Performance varies, but minimum 8 hops of 1000 ft. between routing nodes in (Back to Top) one ‘leg’ can be accommodated if they are in a true mesh (see Design section). End nodes are rated for 1000 ft. also, but can often communicate over longer distances.
To ensure good connectivity in a line, radios should be able to hop over an adjacent radio to the next in line. Shorten the distance between radios to max. 600 feet to retain reliability.
You can have up to 12 routing nodes per meshing Base, and up to 3 end nodes per routing node. End nodes can also communicate directly to the Base. In the Star Base configuration (set by your SensMit provider) you can have up to 60 end nodes per Base, and communication distances can be up to double those specified, but no hopping (routing nodes) is possible.
There is no minimum distance.
Range is greatly improved by installing the nodes to have true ‘clear line of sight’. See the manual and “What does Clear Line of Sight Look Like?” to understand what CLoS means.
Installations range from 10 nodes/acre and more, to 1 node per 30 acres – it depends on what you are sensing, your crop and how uniform your soil conditions/operations are. See http://www.irrometer.com/sensors.html for information on deploying Watermark sensors.
SensMit transmits at about 1/50th the intensity of your cell phone.
No – they operate on unlicensed bands, and those bands are set at time of manufacture for the regime in the region to which they are shipped.
At Design and Installation Manual. You should also take a look at the wordless manual.
A mesh demands that each routing node have two or more paths to the Base as shown in the figure below.
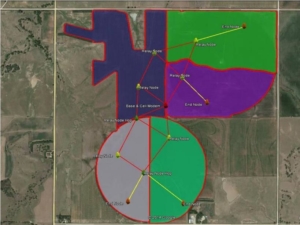
Your supplier may provide a design service for you. You can also easily do it yourself – read all the steps before starting and also review the wordless design Manual.
- Get a satellite or google earth image on paper of your farm site in a known scale
- Make a circle template that represents 1000’ radius = 2000’ diameter in that scale. This is the design range over which each radio (and Base) communicates.
- Pick a location for your Base – ideally as near the site’s center as possible for Logger or Modem gateways, or within 800’ of your PC-link.
- Use the circle template to pencil the range around the Base. Any ‘next’ routing node must be placed at least in that circle. Draw a circle around the new routing node. It is fine and in fact preferred if circles overlap!
- Move outwards from the Base’s circle and continue drawing circles for routing nodes building a ‘skeleton’ until you have reached the edges of the whole site – you can only have 12 routing nodes per Base. Make sure that there are at least two routes from each routing node back to the base.
- If there are any other areas where you want a node, put end nodes in to fill in the gaps. There can be three end nodes per routing node.
You need at least a Base, a Gateway and a single routing node for the system to operate correctly. A base configured by the suppliers as ‘Star’ can use either an end or routing node.
Nodes must have clear line of sight to perform well at maximum range. Any metal between devices, including wire fences inside the ‘clear areas’, can significantly reduce range.
Devices must be 3 or more feet above the final crop height, and at least 8 to 10’ above the ground (Base ideally 15’ or higher) to approach specified range. In cases where true maximum range is sought, the formula below must be applied, resulting in heights of 15 feet and more. c/f = 3 x 10^8/985,000,000 = 0.30.
See the diagram below for horizontal/vertical clear areas:
EXAMPLE: If the distance between two SensMits is 1000 units and a 10 unit tall obstacle is 200 units from one, then using the calculation (c/f = 0.3 for 985MHZ radios) the towers should be 7 units taller than the obstacle i.e. 17 units tall. See page 4 of Installation Manual as well.
Installation
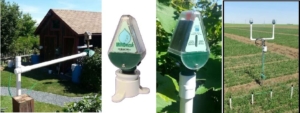
No. Radios are designed with standard .” NPT collars and so can be installed using .” thick-walled irrigation pipe and fittings to suit your needs best. Some examples:
Associate means to link a device with the unique Base ID that defines each mesh. This is a semi-permanent action that prevents the device speaking to any other Base.
Join applies to a previously-Associated device connecting to either the Base or another node of ‘its’ mesh. If you are installing multiple bases, do associations of nodes with one base at a time. This ensures you will know which nodes report to which base.
- Virgin – a node has not been associated with a Base yet and is trying to find a Base to associate with. You will see repetitions of the red, amber and green cycling, and then the red and amber flashing together. Once it has associated with the Base, the green light will flash and pulse.
- Seeking – this node has been associated with a Base before, and is now trying to join the mesh. You will see just the red and amber flashing together, and some non-flashing times as the unit waits to retry the join. Once it has joined the green light flashes.
- Start-up – this sequence shows a node that has either just reset or whose increasing voltage has just enabled it to start up. You will see the red amber and green lights scroll and flash in a variety of ways for a few cycles, and then see the red and amber flash together until the Base is found, and then see the green light start to flash.
- During data collection/transmission – you will see the green light flashing continuously and an occasional amber flash.
- Resting ‘awake’ node in between 30 minute intervals – you will see a brief green flash every two seconds
- During dis-association from the Base – see Changing Components section below
- Logger, when being locked out by IRROmesh Downloader. The red light flashes on a 2 second interval.
‘No lights’ mean either the device is completely de-powered, but more likely it is either resting in between attempts to rejoin the mesh, or it is asleep. If it is resting it will try to rejoin the mesh every 10 minutes or longer depending on the power it has available. If it is asleep it may not show any lights for up to one hour. (See Sleeping and Non-flashing Nodes below)
In general, no. Cloudy-bright conditions are enough for nodes to manage all charging and operational processes, and only one panel needs to be in ‘full-light’ for the node to fully function. For routing nodes, it is best that one panel is in full light as often as possible. When even one routing node of a whole mesh doesn’t have either panel in full-light (excluding the period around noon), the whole mesh can go to sleep. For end nodes, it is fine if the panels are not in full light.
General guidelines are found in the Installation Manual. Your IRROmesh provider also has complete manuals available. Irrometer has also released several videos that are good about explaining how to set up the nodes for your meshes.
Prepare to install:
- Start charging Base in bright conditions – once the green light is flashing and gateway has joined (see below), turn it off
- Prepare Gateway
- Logger – needs to associate and join – start charging same time and right beside Base until red and amber are flashing together on intervals (will also see all three lights rippling on and off intermittently) and then flashes green or it goes to sleep. (Back to Top)
- Modem – needs to associate and join – turn on and verify red light on modem itself is flashing once per 2 seconds indicating a cell connection has been made. Verify that its node is searching for Base (as Logger above), and then flashes green or goes to sleep
- PC-Link – needs to associate and join – leave plugged into a pc or USB power source for an hour or more to fully charge and start looking for Base. Verify that node is searching for Base (as Logger above), and then flashes green or goes to sleep
- Place all routing and/or end nodes within 2 feet of each other in the sun and let charge ’till red and amber are flashing together on intervals (will also see all three lights rippling on and off intermittently). NOTE – there can be intervals of up to 5 minutes between light flash sequences.
- Bring the Base within a 2 foot circle, turn Base on and leave all together for an hour (or less if all nodes are flashing green, have flashed green, or have flashed green and turned off (i.e. do not flash for 5 minutes)).
Install:
- Install Base at its final location first, then the gateway. In the case of Logger, once it is installed, connect via USB to a PC showing the correct time and date, that is running either SensMitPath or IRROmesh Downloader software. Ensure the software’s dialogue box also displays the correct time. Once logger is started and installed in its final location, download and review data after one day to verify the whole mesh is reporting, mesh time is correct, and sensors are correctly installed etc…! See the logger manual at Logger Manual
- For fastest first transmission of data, take the nodes to their final destination one at a time, starting with the one closest to the base and working outward.
- For potentially slower reporting, just place all nodes where you want them in random order.
Confirm that the node and Base are no more than one foot (30 cm) apart during the Association process. If this still does not work restart the Base.
Sensors
Nodes are currently configured to serve up to 3 Watermark sensors, a soil temperature sensor, a tipping bucket counter and an irrigation or on/off switch. Each node has a sensor that delivers device-internal temperature, and each monitors and reports its internal power levels and charging rates.
If you are not using all available sensor-attachment wires coming from a node (this is common) be sure to protect them to avoid excessive power consumption. For unused M1-M3, and T1 wires, connect pairs together and protect from moisture. For unused Tip or Switch sensor connection wires, do not connect them together. Protect each wire end individually from moisture. See the Mounting & Wiring IRROmesh Nodes video for detailed instructions on how to protect the wires.
Up to 1000 feet using 18 gauge wire.
Connectivity – from Mesh to SensMitPath/Logger
Go to Downloads and see the Using SensMitPath Software Manual
IRROmesh/SensMit is unique in the way data is retained and transferred. Because each component of SensMit (except nodes) can retain months of data, each link and device is in effect a data logger awaiting download in either real-time or when the user downloads it manually.
The simplest gateway to use is the PC-link. It must be in sight and within 3-800 feet of Base to receive data – longer distances may be possible with clear line of sight and elevated devices.
Whenever PC-link is plugged in and powered (to a PC or any other USB power device), it will collect and store the data coming from Base. If plugged into a PC and its SensMitPath software is running, the data will be transferred/stored on the PC. When the PC is connected to the internet and SensMitPath is running, any stored data will be sent to the site, and any incoming data from PC-link will stream to the website in real time.
It can take up to an hour for the PC-link device to charge up the first time it is installed.
If you need a cell modem, GSM provides good coverage globally and is price-effective. But with the GSM network gradually being taken down in the USA, other options may be preferred. Work with your SensMit provider to determine the best option for you. Do not exchange the SIM card that comes with the modem for another – it will not work.
You can use any WindowsTM-based PC or a tablet using a full-WindowsTM version (not WindowsTM Mobile). If you are streaming data ensure the PC’s automatic sleeping is disabled completely and that SensMitPath is placed in the PC’s auto-start menu so it can recover after automated WindowsTM updates and power interruptions etc… Instructions are at http://sensmitwebdiv.com/resources/. Many firewalls are supported, but be 100% certain that Trend Micro is not running as it corrupts posts and will generate 400 series errors being returned (visible in the SensMitPath screen) from the website.
SMP randomly staggers the send time for posts so as not to overwhelm the input to the server. It can take up to 15 minutes after posts are received for them to be sent to the server.
Non-real-time systems that use Logger are for cases where there is no web-connectivity on site or if your preference is to manually collect and store your data. Download times from larger meshes’ Logger to the PC can take quite a while (about 1 minute per day of data for 12 nodes). Do not use a Logger if you want to stream data – leaving a Logger connected to IRROmesh downloader will result in its being ‘locked out’. See Logger Manual on our Downloads page.
Connect logger to either Irrometer’s IRROmesh Downloader http://www.irrometer.com/download/975-DL.exe if you only want a CSV file, or SensMitPath which you can download from SensMitPath. Once the program is loaded and running, push ‘Find SensMit’ and wait until the time at the bottom left of the software’s pop-up window shows the hours, minutes and approximate seconds in your local time (Daylight Saving Time is not supported). The displayed time in the program’s dialogue box has to match your PC time before you disconnect logger’s USB plug. Logger is now ready to put in the field near Base.
Download Logger by first starting SensMitPath or IRROmesh Downloader on your PC and then plugging Logger’s USB in. If it does not auto-find your SensMit, push the ‘Find SensMit’ button. Alternatively, first plug Logger’s USB in, and then start the program. You may need to push the ‘Find SensMit’ button or unplug and re-plug the Logger’s USB cable in if the download does not start automatically. You will know the download is complete when you see no more activity for 30 seconds in the program’s dialogue box.
Logger can be downloaded in the field, or brought home to download (in which case switch off in the field, turn on at home and download, then turn back off). If you notice that mesh time has drifted (say sunrise or some event does not line up with data reported by a node) you can reset the mesh time with Logger. The PC’s time is carried by Logger to the mesh if Logger is left turned on after downloading and then sees the Base. Otherwise, the mesh time will prevail.
Base always sends Logger any data Base has stored, so Logger does not miss data if it is taken from the field for a period of time; when brought back to field, Base will send all data since Logger left.
- First make sure you only have one version of SensMitPath or IRROmesh Downloader running.
- Then push the ‘Find SensMit’ button and wait for a minute. If that does not work a driver may be missing. The cable that connects logger or PC-link to your PC needs a special driver that does not always install automatically. Go http://www.ftdichip.com/Drivers/VCP.htm to download the driver, and follow the installation instructions.
SensMit Logger V2.33 needs to have Base V2.30 and later, and SensMitPath V2.34 or later or IRROmesh Downloader. Also see Logger Manual.
Connectivity – from SensMitPath/Modem to SensMit Web
Log out and log in again.
There may be a pathway through a corporate firewall embedded in your uplink if you are not sending data to SensMitWeb directly. Contact your corporate IT person for assistance.
You likely need to ‘allow’ SensMitPath through your either your PC’s and/or your corporate firewall and anti-virus programs. Contact your corporate IT person for assistance.
Look for the daily spike in the power chart of the device in question on the 24 hour chart. Divide the reading by two to get your code version.
Data up-send times are staggered to reduce traffic jams in the data flow entering the website. The last two numbers of your Base ID are used to set the stagger time.
There is a full mesh reset function. It is initiated by depowering the Base (and shading its solar panels completely) or removing it from the site completely for a minimum of 16 hours. Then restore/restart the Base to restart the mesh.
Data and Sensor Readings
Having a free-standing Base lets you install it in the location (say atop a tall pole) where it serves the mesh best. A free-standing Base also enables you to exchange Gateways without affecting the ongoing operation of your system.
As soon as sensor readings are taken by the radios, they are encrypted and converted into http posts. Decryption does not happen until the data is processed at the website. Each SensMit has a unique ID that is ‘burned’ into the radios when they are first associated with ‘their’ Base, preventing radios from talking to any other mesh.
Yes, you can use SensMitWeb’s CSV download function to create a file that most 3rd party software packages will read.
You can access http://www.sensmitweb.com from any PC, Smartphone or Tablet connected to the web.
Go to http://sensmitwebdiv.com/resources/ and carefully follow the SensMitPath installation instructions. If you are just logging data to use in Irrometer’s WaterGraph software, download IRROmesh Downloader http://www.irrometer.com/download/975-DL.exe.
The data is stored in a file called post.txt that you can find in the same directory on your PC as SensMitPath or IRROmesh Downloader. If you are streaming data to the website, the post file’s data will automatically be sent up to the site by SensMitPath (must be running!) where it will be decrypted and displayed. If you are using IRROmesh Downloader the data is stored in a CSV spreadsheet in the same directory as IRROmesh Downloader. You can take the file and upload it to WaterGraph directly, or into any other application that supports this CSV format. See also Logger Manual.
No. The data collection and storage interval is currently fixed at 30 minutes. Data is reported to the SensMitWeb site every 30 minutes while the mesh is awake, and once an hour when it is asleep.
Yes. CSV data files can be created from the information stored on the site and then can be downloaded for use in other applications. The site provides push and pull API capabilities to enable real-time data sharing. When you are logged into SensMitWeb go to the “Utilities” tab and there you can either export Mesh Data or upload CSV data.
The http://www.Irrometer.com site and Sensor Info provides complete information on using WaterMark soil moisture sensors. Each node’s internal temperature sensor gives the temperature inside its case. In general, the night-time temperatures given are similar to adjacent air temperatures minus wind effects. Daytime temps shown are ‘greenhouse’ temperatures and will usually be a lot higher than the outside air temperature.
Yes, but only while using SensMitPath, which directs all data to the SensMitWeb site only. Logger will then be powered by its Super-caps or batteries, so ensure its power supply lasts as long as it is needing to streaming data. Consider getting a PC-link if this is a long-term situation.
No. If you try to stream data using the IRROmesh Downloader for more than 5 hours, the Logger will shut down for 24 hours (red light flashing on and off) and data sent to Logger during that period will be lost. Other lock-outs exist to prevent streaming SensMit data outside the SensMitWeb service.
Ensure the Base is connected to its power supply. Ensure the right time is displaying on the PC itself that is running SensMitPath or IRROmesh Downloader.
Node Activity – Sleeping/Non-flashing Nodes
The radios use of combination of ‘mesh-sleep’ and ‘self-sleep’ to conserve power. In general, the radios are asleep during low/no light conditions, awaking briefly every . hour to read sensors and communicate data. During cloudy-bright and lighter conditions, the mesh is fully awake and operating continuously. See ‘Sleeping and Non-flashing Nodes’ below…
How does a time-stamp get attached to the Data? The time is introduced to the mesh via the PC used to communicate with it, or via the cell network in case of a modem.
You need at least one routing node for a mesh, or else the Base does not know when to sleep. The Base in Star-type meshes self-sleeps. If the Base is still not making it through the night ensure that the connection to its super-capacitors is not interrupted.
It is likely asleep. The nodes use a combination of ‘mesh-sleep’ and ‘self-sleep’ to conserve power when they are not in medium to bright light conditions. In general, the radios are asleep (no lights flashing most of the time) during low/no light conditions, awaking briefly every ½ hour to read sensors and communicate data.
Yes, it sleeps most of the time. The lights come on when you start the download process.
With SensMitPath version 2.33.8 and newer you can wake a sleeping PC-link. Disconnect the USB cable until the green light on the PC-Link flashes. Plug the USB back in. You will see the green light flash (to indicate it is awake) with an occasional brief red (to indicate the rest of the mesh is not).
There are a number of possibilities:
- The charging system in one of the mesh’s routing nodes might not be getting enough power to stay on full-time, which can put the whole mesh to sleep ‘till the next . or full hour, even though light conditions just changed.
- A node just used most of its power to join the Base, resulting in the whole mesh going to sleep.
- This node could be trying to re-join the mesh, and is sleeping for 30-360 seconds (usually) or up to 16 minutes between tries depending on conditions before trying again.
- If the mesh has been up and running, and one or more new nodes have been installed, and you have installed them within specified range and clear line of sight, the system will sort itself out without further input.
- If this is a new just-installed mesh, and you have installed nodes within specified range and clear line of sight then:
- If you are not using a modem and are using a PC/SensMitPath, ensure local PC, proxy server and corporate firewalls ‘allow’ SensMitPath, upload.SensMitweb.com outgoing, and SensMitWeb.com incoming. Trend Micro (if you are running it) needs to be completely disabled, it is not enough to ‘whitelist’ SensMitPath.
- Confirm that the gateway is active:
- Modem: red light on the inner modem box itself is flashing once every two seconds and its node has been associated with the Base.
- Logger: has been connected to PC/SensMitPath since installation and SensMitPath has found the device, and the time under the SensMitMesh logo on the dialogue box below the SensMitPath window is correct.
- PC-Link: is connected via its USB cable to PC/SensMitPath, the PC’s sleep commands have been disabled and power source is reliable, and SensMitPath is in the auto-start menu (instructions here), and the PC is connected to WWW.
- Confirm that the base is connected to its power source.
Click the check box that says ‘low power mode’ at the top of the SensMitPath screen. Please contact your supplier if you must place Logger in a location where there is no or very little daylight. Do not attempt to alter any part of the Logger device – there is an electrical/current hazard.
Likely one or more routing nodes are not getting enough power due to shading or equipment problems, and are putting the mesh to sleep. If your PC-Link power graph is usually in the ‘high’ state (see above) this indicates a mesh that is usually asleep during the day. If one of the PV’s of a routing node has failed, is badly shaded, or covered in bird-poo for instance, then that node will go to sleep to conserve power (see ‘poor node’ above). When one routing node goes to sleep, the whole mesh can be put to sleep by the Base because all the nodes that route their data through the ‘must-sleep’ node now also have to sleep. The mesh will still deliver data on a . hour interval, and new nodes can usually still join. But a mesh that is fully-awake for a portion of each day enables top performance. It is best to maintain the nodes so that any sleeping that must take place is due to valid situations, like dimming light at the end of the day.
It is usually due to it being light-starved, or may mean it has fallen over, or an obstruction has been placed between nodes. End nodes can exist in shade and need very little light, but routing nodes need to have good light access. Even a small obstruction or shading on a routing node has to be avoided.
In cases where a number of nodes can report through only one pathway, and a node at the beginning of that pathway stops reporting, all the downstream nodes will also stop reporting. Once the beginning node is restored, all the other nodes’ data will come in.
Either install a bird deterrent on top of the node (available from your supplier) or install a bird perch higher than the node and on its North side.
Navigating the SensMitWeb Service
Check that the ‘hide’ function is not on for that node(s). Click the ‘eye’ icon right beside ‘SensMit Status’ to toggle it on and off. Then be sure that the ‘eye’ at the far right of the SensMit’s information row is also on.
One or more of the coordinates you input are wrong. If a quick visual inspection does not resolve which one, delete the coordinates of one SensMit at a time until the correct map appears.
Make sure to take a look at the SensMitWeb Manual User Guide if you are having further problems.
Changing Mesh Components
Your system provider can provide you a disassociation device. Disconnect the soil temperature sensor from the wires coming from the node. Hook up the Disassociation device’s alligator clips to those wires, make sure the node is powered up and then let go. The device will not function if your fingers are in contact with any part of it.
- The LEDs all turn on for 1 second, then all start flashing, first for . second, then . second, then faster and faster until solidly on – this takes 4 seconds in total.
- Then the LEDs will turn on solid for 4 full seconds.
- The User MUST now handle and remove the Disassociation device during the 4 seconds the LEDs are on solid.
- The LEDs will blink one time to acknowledge the removal.
- The SensMit is now disassociated and will reboot (make sure it is not near an operating base or it will re-associate with it!)
If the disassociation device is not removed during the 4 second window the disassociation is ignored and the SensMit will just carry on as usual, and the presence of the Disassociation device will be ignored until removed.
Leave a new ‘virgin’ node in the sun or under a (non-LED, non-fluorescent) desk lamp until its starts looking for a Base (or power Gateway to start its virgin node). Then bring it within a few feet of the Base (while the Base is awake!) until the red/amber flashing changes to green. It is now Associated with the mesh. Make sure you have first removed the old gateway if you are introducing a new one!
Attach the dis-Association tool to the wires leading to the soil temperature probe. See instructions above. The node is now virgin and can now join another Base.
Remove the old Gateway from power or from the site – Base must no longer be able to ‘see’ it! Power-up and Associate the new Gateway with the Base. Restart the Base by disconnecting its power supply and covering its solar panels until all lights are out! After restarting Base, look for the lights flashing in the start sequence to confirm it is restarting. The new Gateway will now be used. In SensMit code Versions 2.33 and newer, the Base does not need to be restarted.
If the mesh is sleeping during daylight hours (not fully awake for a period of time every day), data and processes can get backlogged, delaying or even prohibiting the Join function. Ensure the mesh is maintained so that it is awake for a period of each sunny day.
Be sure the node you are intending to connect to, is a routing node or the Base. Be sure this node has not already been associated with a different mesh.
Diagnostics
There are a number of things the chart can tell you for each device:
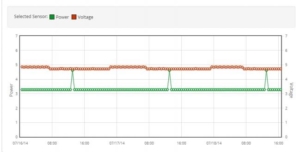
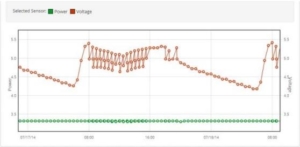
This base or solar-powered data logger below is functioning normally – you can see the light intensity reflected in the duration of high voltage, and so can see that days three and four were sunny in the afternoon only, and that the last day was cloudy. The spikes in the power chart relate to the code version – divide reading by 2. In version code 2.4 and newer, a second spike that reaches much higher indicates a device failure, and should be reported to your provider.
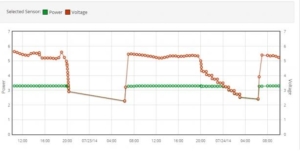
If you see your Base (as below) showing the part of the graph on the left side, or the graph does not even show the vertical dots, it is disconnected from its power storage. If you are seeing the shape on the right, the Base likely has no routing nodes with it or in sight, and so does not know how to sleep.
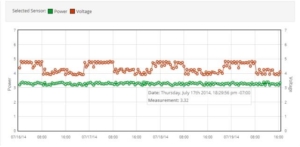
This node has one or more poor or obstructed solar panels, and is repeatedly sleeping, recharging and waking during the day. You can see when the light fades and proper sleeping commences, it’s a nice regular slope.
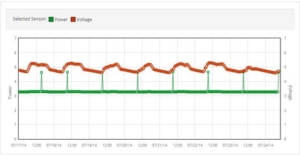
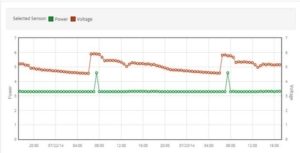
This node is showing normal wake and sleep patterns – the dip at noon shows that neither solar panel is pointed at the light, so it sunny. When there is no dip, it is cloudy because clouds provide light coming from all directions. The spikes indicate the code version: hover your mouse over and divide the reading by two to get this device’s code version.
This PC-link or modem gateway’s fuzzy and irregular power supply chart is poor-contact your supplier as there is something wrong with this device and so this mesh will not work as well as it could.
This PC-link gateway is good – you can see when the mesh is asleep (higher power) and when awake (lower power).